Are you a fan of monograms? If so, I am sharing all my tricks to teach you how to make a monogram using Cricut Design Space! You can carry this method over to almost any design program and I am sharing interlocking monograms and circle monograms with a picture tutorial + video!
This post may contain links to Amazon Associates and other affiliates.
As an Amazon affiliate, I earn a small commission from these links at no additional cost to you.
Monograms are a fun and trendy way to add personalization to any project! From wine glasses and coffee mugs to shirts and hats. You may even see monogrammed car decals! If you have a blank, a monogram can go on it!
You can find many things to personalize in my Amazon Shop!
If you don’t already have Cricut Design Space you can download it for free here. You will first need a Cricut ID if you do not have one already.
In fact, you can find a monogram maker and monogram generators online but you have very limited ability to edit what it produces. Once you see how easy it is to make a monogram yourself you will never make one another way.
What Is a Monogram?
A monogram is a person’s full name initials in a precise order! In general, monograms are laid out first initial, last initial, middle initial. By all means, you can read in detail everything about monograms and how monograms differentiate from initials, different styles, design elements, and more on this post here.
You can also find my favorite 30 Free Monogram Fonts, How to Install those fonts on your Computer, as well as FREE SVG Monogram Border SVGs.
Ideas to Monogram:
Really it would be faster if I listed items you couldn’t monogram! Here are a few of my favorites! You can use your Silhouette or cricut machine to cut the monogram to apply in iron-on or adhesive vinyl. You can also laser engrave many of these items with an xTool laser.
- Mugs
- Tumblers
- Tote bags
- Hats
- Phone Cases
- Car Decals
- Wine Glasses
- Pillows
- Linens
- Ornaments
- Blankets
- Shirts
- Shorts
- Sweatpants
- Swimsuits
- Beach Towels
- Binders
- Wallets
- Stationary
- Backpacks
- Robes
- Logos
You can find lots of items to personalized here in my Amazon Shop!
Besides cutting the monogram borders with your Cricut or Silhouette machine from craft vinyl or iron-on you can also use the .png file to create cards, stationery or wedding invites.

Monogram Maker Video
Follow me on YouTube for more Cricut & Craft videos!
The tutorial below is using Cricut Design Space. This is the same process for Adobe Illustrator, Silhouette Studio, Embroidery software, Word Document, or any other program you can add and manipulate text! Ultimately, don’t worry if you are not #teamcricut!
How to Make a Monogram in Cricut Design Space
Time needed: 5 minutes
- Download your favorite monogram font.
Start by choosing your font. You can find awesome ones on my 30 FREE Monogram Fonts post! You can find details on how to install them on your computer here.
- Open Cricut Design Space to a blank canvas.
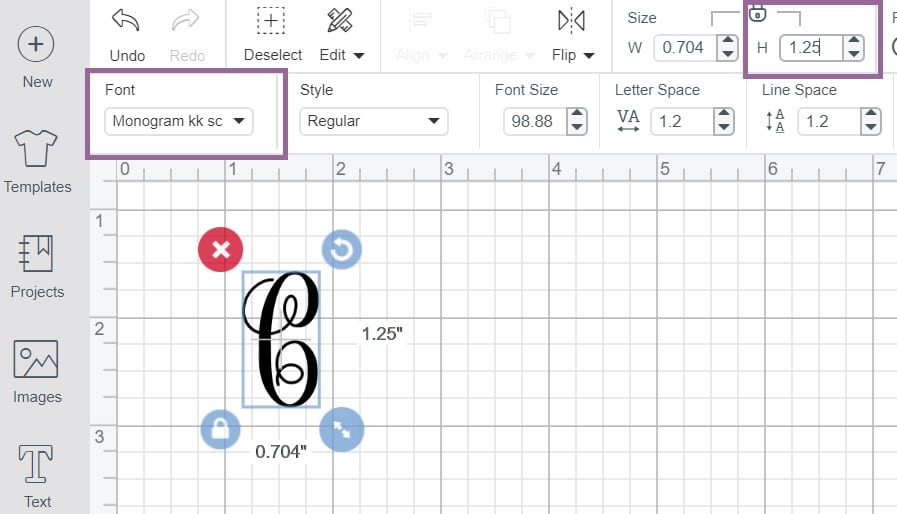
- Type your FIRST NAME INITIAL using the Text Tool.
- Select your font.
Next, with the initial text selected, choose your font (Monogram) from the font drop-down located in the text layer panel. I like to size this first initial at 1.25 inches.
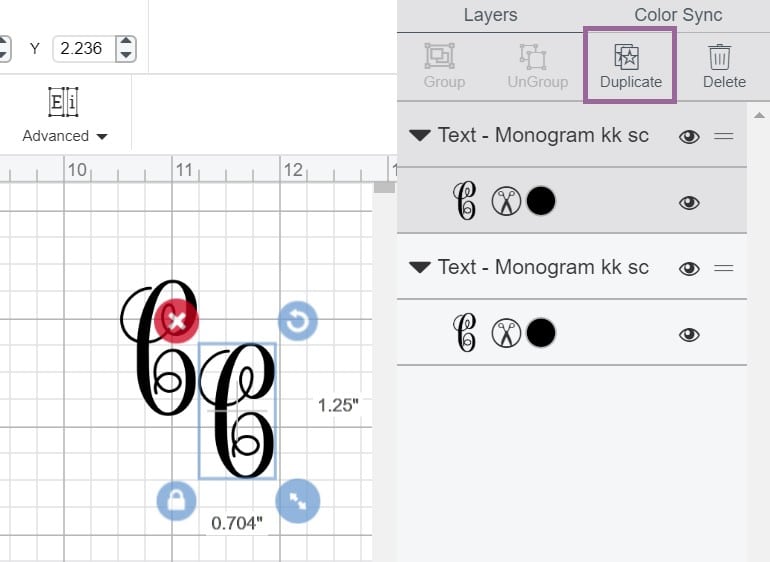
- Add the MIDDLE name initial.
While that initial is selected, click Duplicate in the Layers panel and change the text to the middle initial letter.
- Add the LAST name Initial.
Repeat Step 5 for the LAST initial and change the size to 1.75 inches.
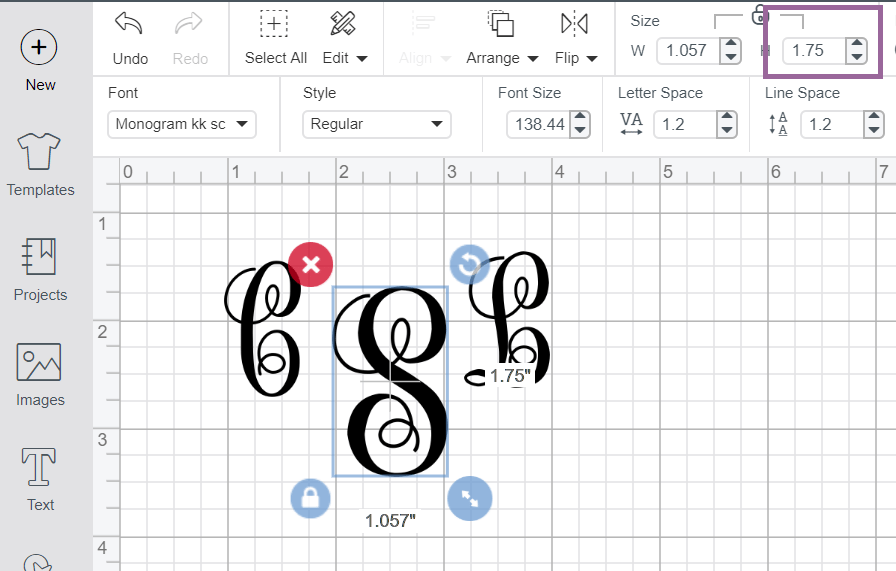
- Center the Three Initials
For alignment, I like to start by selecting all three initials and aligning the vertical centers of the letters. From there I can use my mouse or my arrow keys to adjust as needed.

- Weld or Attach Your Initials
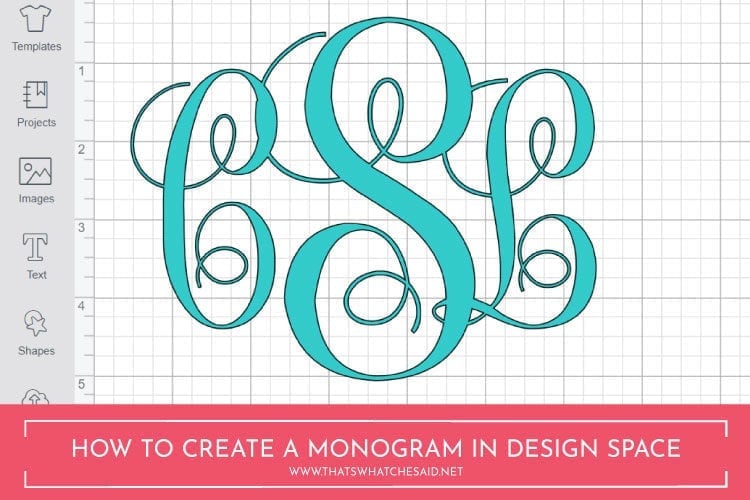
For Interlocking Monograms (pictured above) where your paths are overlapping, you want the monogram to cut as one piece versus 3 pieces. To accomplish this, we will select all three initials and choose the WELD tool at the bottom of the Layers Panel.
For Non-Interlocking Monograms (ex. circle monograms) where your paths are not overlapping, you want the monogram to cut as it appears on your Canvas screen. To accomplish this, we will select all three initials and choose the ATTACH tool at the bottom of the Layer’s Panel.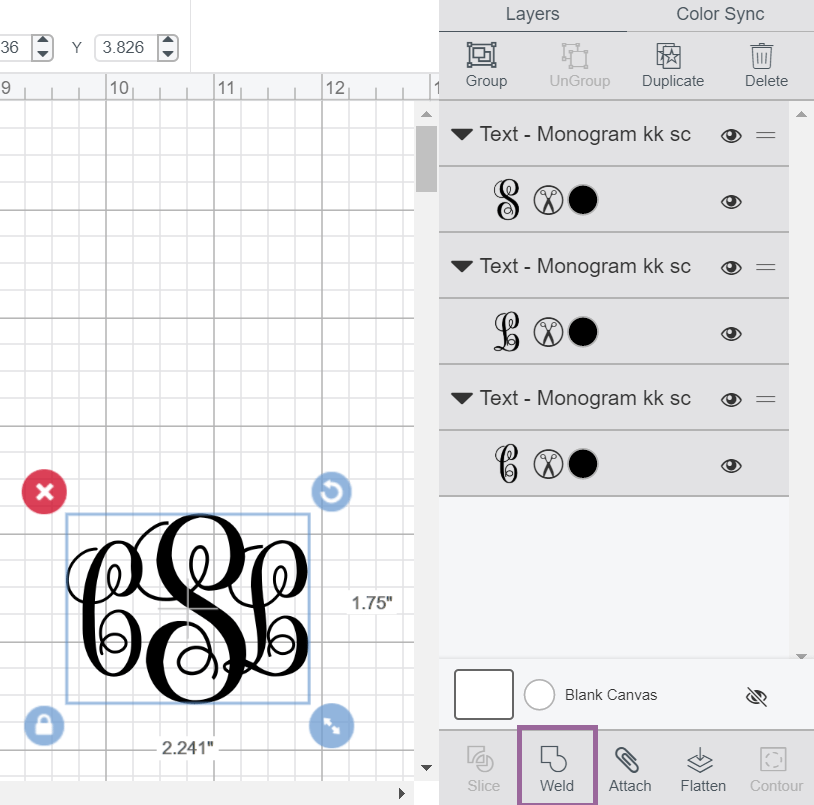
- Make It! Cut Your Design.
Lastly, click the Make It button in the top right and follow the instructions in Design Space to cut your finished design! If you think you will use this again, don’t forget you can SAVE it in your projects in Cricut Design Space.
NOTE: If using Iron-on, don’t forget to MIRROR your design!
Supplies for Pesonalized Projects:
- Cricut Machine (Maker or Explore)
- Adhesive Vinyl & Transfer Tape
- Iron-on
- Weeding Tools
- EasyPress & Mat
- Your favorite blank

If you need detailed instructions on cutting a specific material on your Cricut machine, you can find more Cricut Tutorials here:
- Cut Vinyl on a Cricut
- How to Cut Iron-On
- Master the Print then Cut Feature
- How to Curve Text in Cricut Design Space
More application tutorials here:
Get more Cricut Tutorials!
Don’t Miss Out!
Get new Cricut Tutorials, Product Announcements, Project Ideas, SVG Files and more straight to your inbox!
PIN THIS POST


Comments & Reviews
cathy says
cheryl i downloaded the fonts but i cant find it in my design space ..
Cheryl Spangenberg says
Hi Cathy, this post here describes how to find the fonts in Cricut Design Space. Also, make sure you re-open CDS after you download fonts. https://www.thatswhatchesaid.net/how-to-install-fonts-on-your-computer/
Polly says
i want to create a logo with the Monogramos font but it separated all my letter to individual one.. do i need to photoshop them?
Cheryl Spangenberg says
Polly, if you are using Cricut Design Space you will need to use the contour tool with that font. If you are using Silhouette Studio, you will need to use the “release path” feature.
Maureen Tagliatela says
So you made your monograms pretty colors is design space, but then do you print them on that color vinyl? Or is there a different way to make them colored?
Cheryl Spangenberg says
Hi Maureen, I cut them from that color vinyl. If you want to use print then cut for paper you can do that as well.
Kathryn Hurley says
Hi, where do I find the lovely cursive font you used please?
Thanks so much :)
Cheryl Spangenberg says
Monogram KK and that is in my 30 best free monogram post that is linked in the how to section!
gitty says
so i was able to do everything, except how do i overlap the letter perfectly ike you did? when i hit weld they welded the letters but spaced out, as it was when you hit align vertically….how do i overlap them before hitting weld and so that its overlapped nicely?
Cheryl Spangenberg says
Hi Gitty,
It sounds like you have all three letters within the same bounding box. Be sure each letter is it’s own text box and then you can use your mouse or your arrow keys to move each letter as you need.