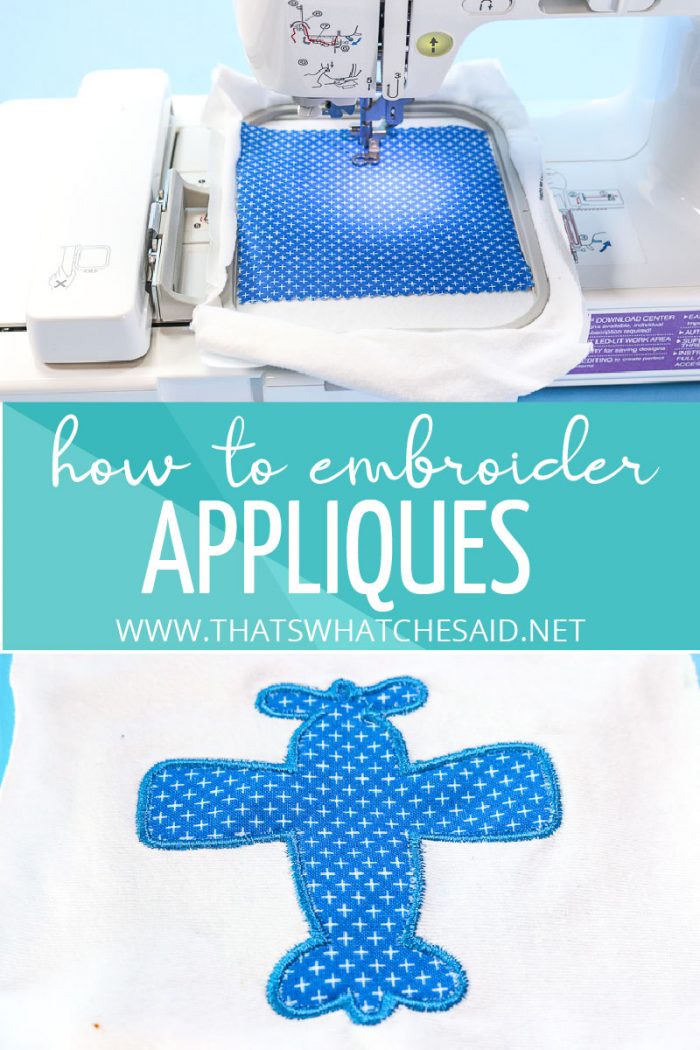
A step-by-step photo tutorial on how to applique with an embroidery machine. This post will show you how to embroider an applique using a Brother SE400. Create Shirts, tea towels, blankets, baby gifts, and more!
I have the Brother SE400 and that is what we will use today. I think you can apply this method to many other machines with minor changes!
Click on any of the post topics below in the Table of Contents to jump to that specific section!
What is an Applique?
An applique is a fabric design sewn onto another fabric base. You can leave the applique with sewn edges or you can use an embroidery machine to finish the edges with a satin stitch
A satin stitch can best be described as a filling stitch. The thread is stitched right next to one another.
Applique on an Embroidery Machine
Click the button above to save to your board for later!
This post may contain links to Amazon Associates and other affiliates.
As an Amazon affiliate, I earn a small commission from these links at no additional cost to you.
Where to purchase embroidery & applique designs:
Here are my favorite places to grab the cutest embroidery applique files! Different embroidery machines accept different types of embroidery files so be sure you read up which types your machine takes!
When you purchase them, they are normally offered in ALL the file extensions!

Notes about the Brother SE400/SE600 Sewing & Embroidery Machine
This specific machine doubles as both a sewing machine and an embroidery machine. I love that I get 2 machines in one and I also think it’s a great machine for hobbyists and beginners.
The maximum size for a Brother SE400 is 4 x 4 inches (actually 3.93 x 3.93 inches) If you are looking to sell products you might want to size up to the Brother PE770 or PE800 (the 800 has a color screen) because those will give you 5×7 inch embroidery area.
The larger area is better for children’s shirts and jammies! The 4 x 4 works great for baby bodysuits and smaller things like towels, makeup bags etc.
How to Convert the Brother SE400/SE600 from sewing into an embroidery machine
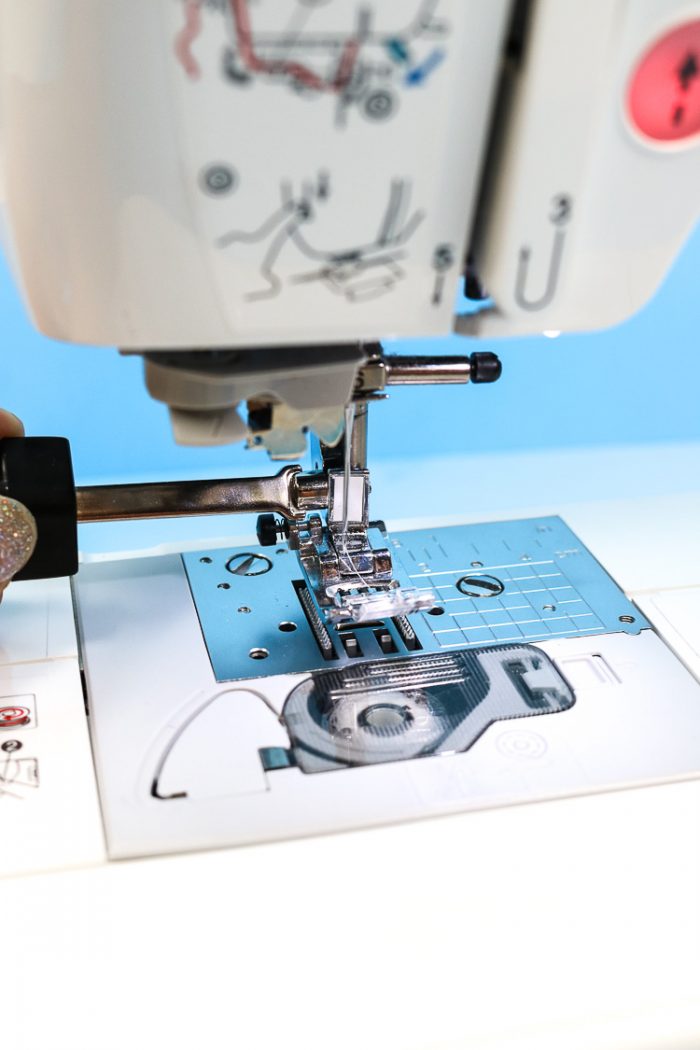
With your machine turned off, remove the front plastic casing and replace it with the embroidery carriage.
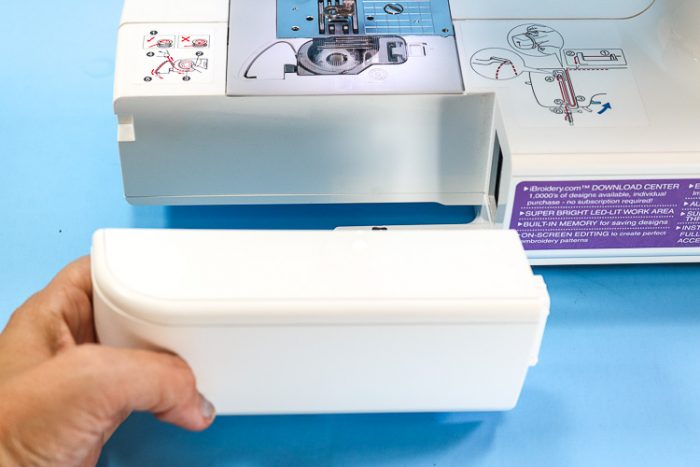
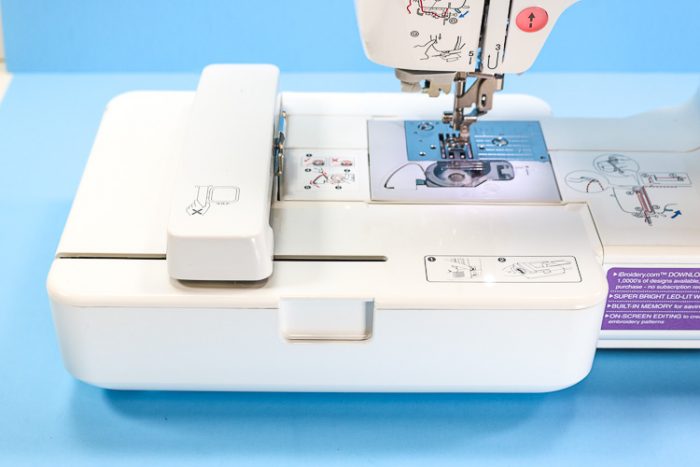
Using the black-handled tool, loosen the presser foot screw and remove the presser foot. Replace with the embroidery foot and retighten the screw.
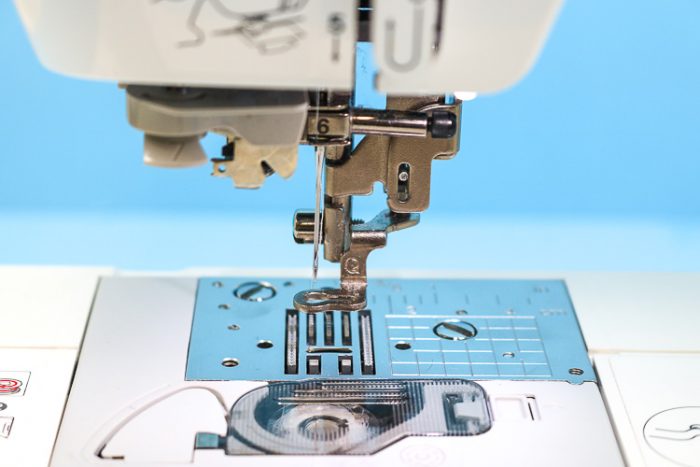
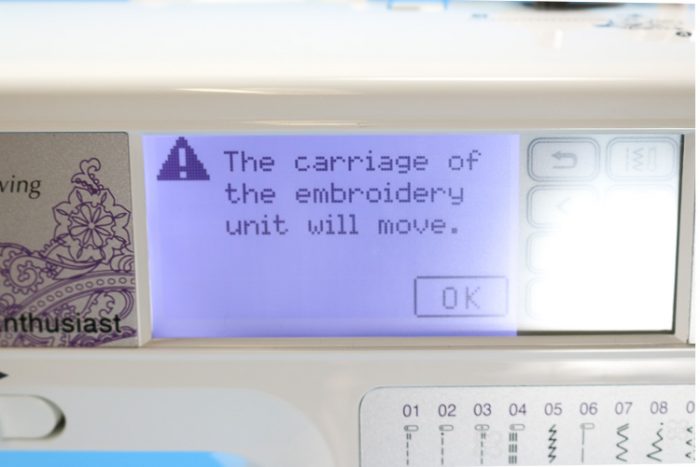
You may now power on your machine. A note will pop up warning you that the carriage will move. Make sure it is clear and press OK. The carriage will slightly adjust to make sure all connections are secure.
NOTE: When removing the embroidery carriage, there is a lever to press under the left-hand side of the carriage. Press this and it will release the carriage from the machine.
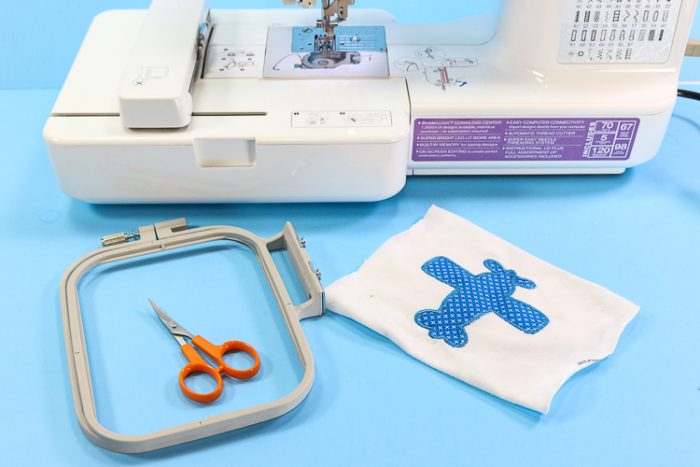
Supplies for Embroidered Applique
- Brother Embroidery Machine + hoop that came with it
- Temporary Spray Adhesive or Fusible Interfacing*
- Tearaway Stabilizer
- Embroidery Thread
- Bobbin Thread
- Small (SHARP) scissors
- Fabric Blank (onesie, towel, etc.)
- Colored Fabrics for Applique (fat quarters work great!)
- *Small Iron if using Wonder Under or Heat-n-bond interfacing
How to Applique on an Embroidery Machine
Time needed: 20 minutes
Step-by-step process for applying appliqué designs to fabric-finished projects such as clothing, blankets, burp cloths, and more!
- Load your design onto your embroidery machine
You can find detailed instructions on how to upload designs into a Brother SE400 here.
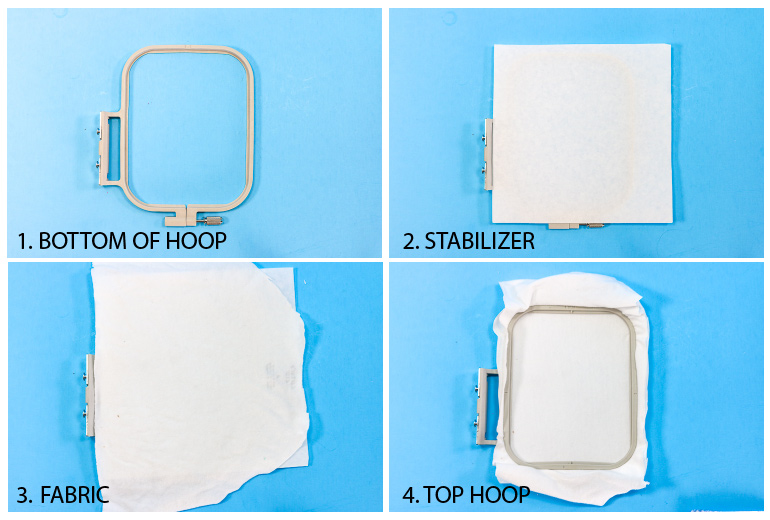
- Prepare your hoop
Layer these items in this order. Place the bottom of your hoop. Add a layer of Stabilizer. Add your finished fabric (onesie, towel, blanket, etc.) Finish with the top layer of the hoop. Secure all together by tightening the hoop screw. Click the hoop into your machine.
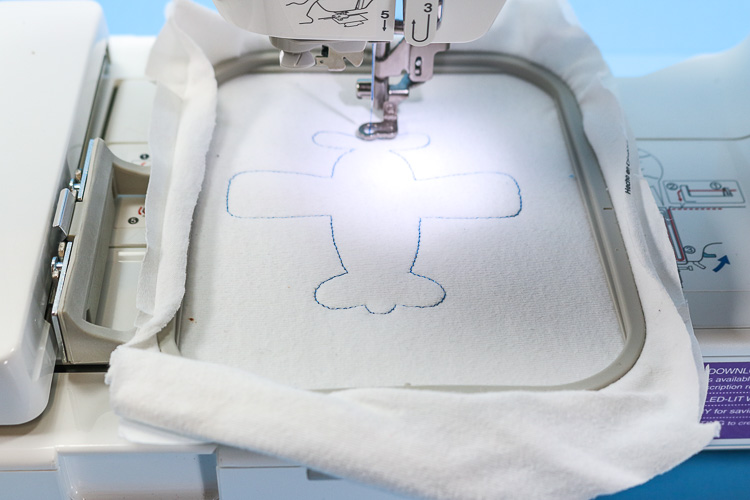
- Stitch the Applique outline
Once your presser foot is lowered, the needle button will turn green and you may press it to start. The machine will stitch a silhouette of your design or placement stitch. It does not matter what thread color you use here as it will be covered up.
- Apply Applique fabric over the stitch outline
There are 2 ways that you can apply your fabric over your stitched outline.
The first method is to use a temporary spray adhesive. Spray the wrong side of the fabric and place it over the outline. The adhesive will help keep it in place while stitching.
The second method and my preferred method is to line the back of your applique material with fusible webbing and hold it in place while the machine performs another outline or tackdown stitch.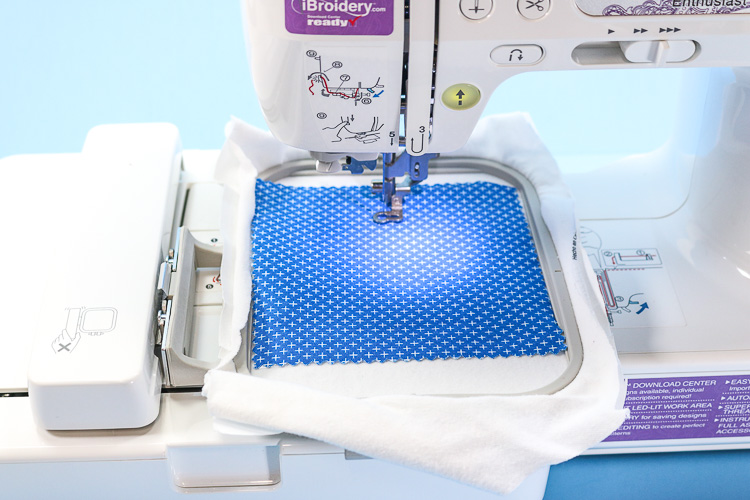
- Run Tack Stitch to Keep applique fabric in place
Press the green button again and it will run another trace stitch (straight stitch) to keep your applique fabric in place. Again, thread color is not important here.
- Trim excess Applique Fabric from Design
Raise the presser foot and carefully remove the hoop from the machine. Using small sharp scissors, cut the excess applique fabric away as close to the placement lines as you can, obviously without cutting the stitches.

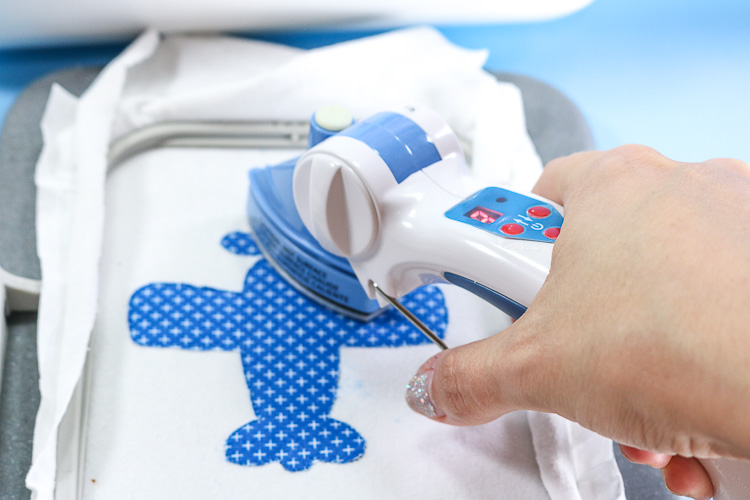
- Heat set in place
If you chose to use the fusible webbing, use a mini iron to fuse the applique fabric to the base fabric. This will prevent puckering during the rest of the embroidery process and also after washing. I definitely like to use this method when making baby gifts or gifts that need regular washing.
- Verify Thread Color
The next stitches will show so you will need to make sure your machine is threaded with the appropriate different thread colors. (bobbin thread never matters since it only shows on the back!)
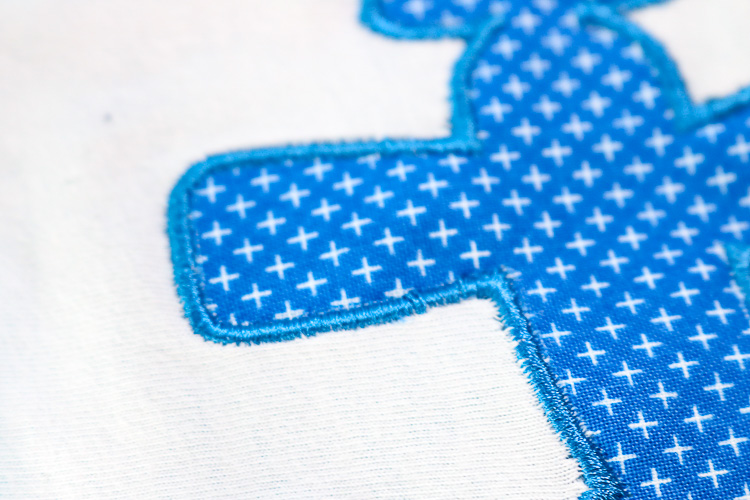
- Add Tack-down stitches
Replace the hoop into the machine and lower the presser foot. Press the green button and the machine will add a zigzag stitch. This will be a stitch that outlines where the satin stitch will go. It is usually a V or E stitch. It is building a base for the satin stitch! It will touch both your appliqué fabric and your background fabric.

- Embroider Satin Stitch
After the tacking stitches finish in the step above, the machine will begin the finished satin stitch in segments.
- Remove stray threads and lint
Remove the hoop from your machine and clean up any long threads with scissors and remove any fabric or thread lint with a lint roller.
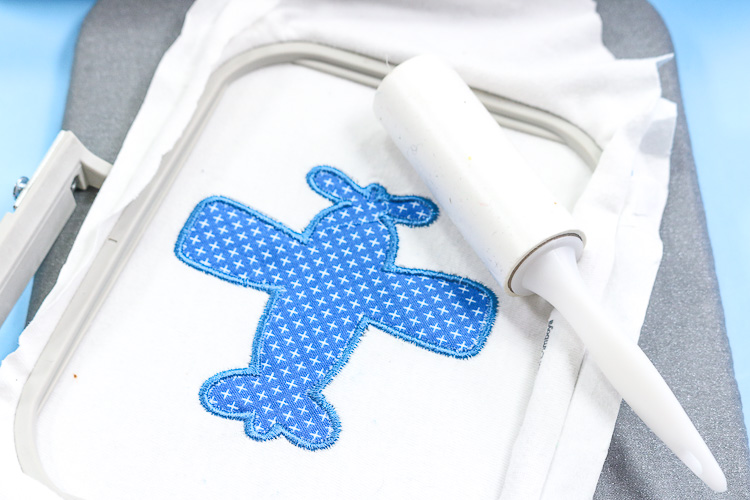
- Clean up Stabilizer
Loosen the screw on your hoop and remove your project. Flip it over and remove the excess tearaway stabilizer as well as any stabilizer in the center of your stitches.
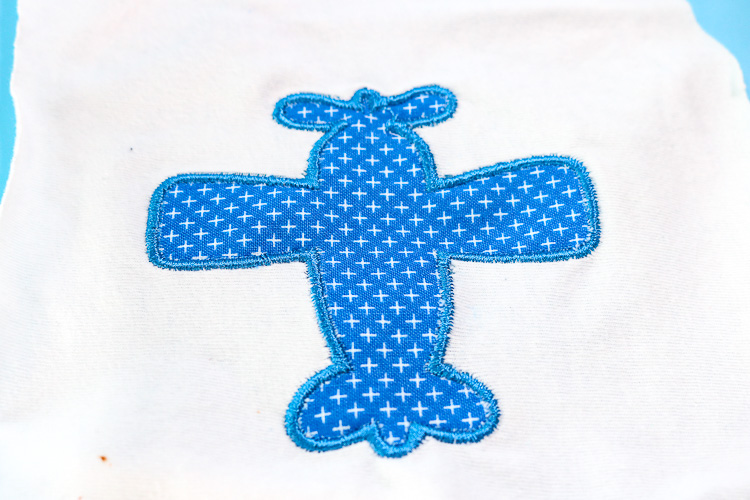
- Finished Project!
You may need to press your final project to remove any wrinkles from your embroidery hoop! Enjoy your project!
Tips for Appliques using an Embroidery Machine
- When adding applique to a shirt or baby bodysuit, be sure you have only the single layer of fabric in your hoop. If you hoop both front and back you will stitch both front and back making wearing the shirt/bodysuit impossible!
- Trim your excess fabric as close to the stitching outline as you can without cutting the outline itself.
- Use a lint roller to grab any stray threads or pieces of fabric after your design is complete
- If using a terry cloth towel you will need to add a water-soluble topping before stitching. (more on this later!)
MORE EMBROIDERY PROJECTS YOU MAY LIKE:


PIN HOW TO APPLIQUE USING AN EMBROIDERY MACHINE


Comments & Reviews
Faith says
Good info
Cheryl Spangenberg says
Thanks Faith! Do you embroider?
Ann says
If you wanted to add a letter or monogram to the applique fabric, would you do it before you applique or after? Does that make sense?
Cheryl Spangenberg says
Ann, I would do it all at the same time unless you needed to rehoop your project. Did that answer your question?
Julie says
Hi there! Great very thorough post! I never thought to use the lint roller. duh. Love seeing that you are from the Lou.
Shayla says
Is the process a lot more complex if more than one fabric is to be used such as in an embroidered flower with petals and such?
Cheryl Spangenberg says
Shayla, I would not say complex as it will just take a bit more time because you have to stop and trim more times! I have made 1st birthday cupcake onesies and Spiderman and Mickey and lots of multi-layered projects and they turn out so cute!
DeeDee says
Wow! This is the most detailed but simple explanation for what I was trying to find. Awesome photos, clear and concise instructions. Where have you been all my life!! Thank You!!!
Cheryl Spangenberg says
Oh, DeeDee I am so happy to hear that! Made my day! Thanks so much!!!
Cali says
This is incredibly helpful! Thank you! Going to try my first applique project tonight!
Cheryl Spangenberg says
I am glad I could help, Cali!
C.H.Lotter says
Hi I just wanna know can the Brother embroidery 90E machine………
Took bigger hoops………
Cheryl Spangenberg says
Hi there, the Brother 90E has a 4×4 hoop size.
Renee Ahtes says
This was very informative but I would like to know how to do an appliqué/embroidery project when both are in the design. Any help would be greatly appreciated!
Cheryl Spangenberg says
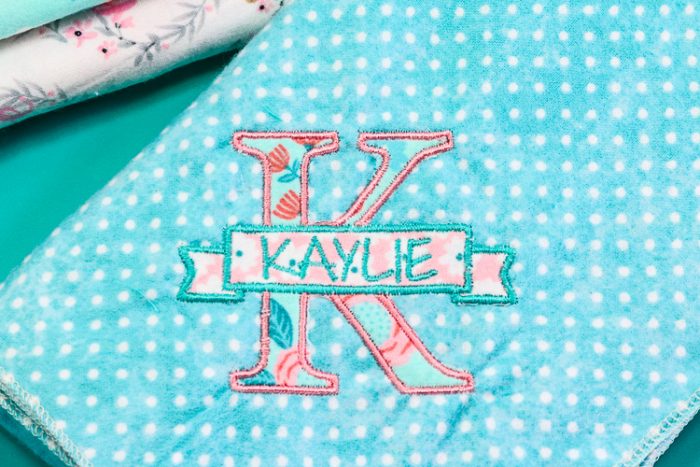
Hi Renee, I am not sure I am understanding your question. Do you mean for example when you applique a large letter K and then embroider the name Kaylie inside the applique?
Vicky says
Thanks! That was awesome!
Cheryl Spangenberg says
You’re welcome, so glad it helped!