Happy Thursday everyone! I hope you are having a fabulous week so far! I am kind of almost giddy to share this project with you today! I heart it. I heart it with cherries on top! Let me introduce you to this super cute, funny stenciled onesie!
My BFF {RG} is having a baby in September! This new little one will be her THIRD boy, so I wanted to make something fun and giggly for this little guy. What do you think??

I couldn’t find any solid colored onesies….so I dyed this myself! More on that experience later! But here is a step-by-step on how I made this cute design on the shirt!

I started off by making a citrus slice in Silhouette Studio (I have designer edition but you can still totally do this without it!) and I placed my words (font: Grilled Cheese) where I wanted them. I made sure to leave room around the edges so that it would be, in fact, a stencil!

Then I let Cammie cut out my stencil and used the hook tool to weed out all the vinyl that I wanted to fill with the fabric ink!

Now I am left with my stencil!

Next, I applied the clear transfer paper over top of the stencil to keep the centers of the citrus slice and the letters (e’s and q) in their correct place!

(it’s hard to tell but that is clear transfer paper overtop the stencil vinyl) Place your stencil where you want it on your onesie! Now Carefully remove the transfer paper!

Now you are left with your stencil in place! Next, let’s get inking! The Fabric Ink Starter Kit comes with black ink…which works out great in my case!
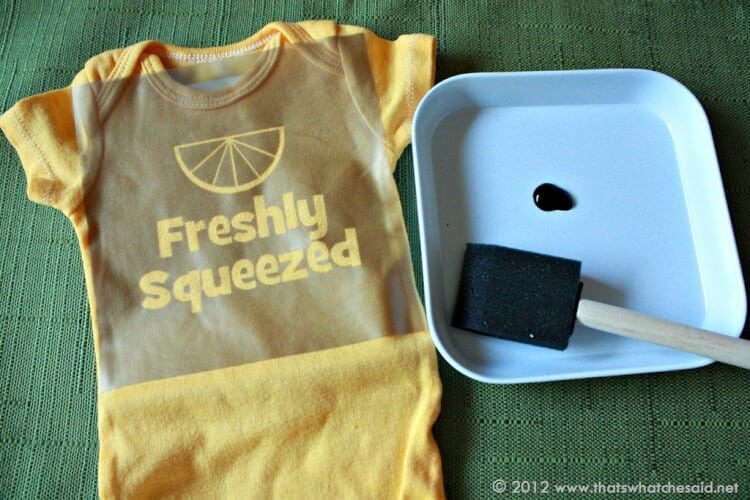
I used the foam brush that’s also included and made sure to get all the edges very well. Especially in between the citrus sections!

I let it dry and then removed the stencil vinyl. Then I used a warm iron to set the ink (not pictured!) Here you have it! A super cute and kind of funny onesie for the new little baby cakes! The fabric ink is machine washable!

(RG if you are reading this…act surprised when your package comes in the mail! :) I love you and miss you and can’t wait for Baby Boy#3 to be here! )
Interested in what came in my Fabric Starter Kit? Well Here you go!


A big thanks to Silhouette for sending me the Starter Kit to play with! I love it and it was so easy and fun to use. I am inspired to make so much more!
What are some of your favorite “sayings” on children’s clothing? I have a few for the boys that I love, but would love to hear yours!


Comments & Reviews
Karen R says
So cute! I have the Silouette but to tell you the truth, I am a little intimidated by it! I’m not sure how to download designs from anyplace other than their online site and I think I’m going to mess up and break the machine!
Any tips?
Val says
I am having the same problem!
Cheryl Spangenberg says
I will do a screencast/tutorial. Would that help? I promise it’s easy and you will be rolling in no time!
Sally L says
That’s really cute. My almost 2 year old nephew has a shirt that says “Hangin with my peeps” with 3 yellow peeps on it. When my son was younger he had a shirt that said “I do my own stunts” with a stick figure falling off a skate board. :)
Donna O'Neil says
Thanks for the tute! I still have a plum district deal that I have to spend soon and was thinking of getting the kit along with a new mat.
Lindsey says
I love this! My new nephew might be getting this when he’s born.
Gen says
OMG that is one of the cutest things I’ve ever seen!! If only I knew someone who’s having a baby… oh and a Silhouette machine, haha! LOVE it!
Cheryl says
Thanks Gen! :)
Maureen says
Cute! How does the stencil affix to the shirt?
Cheryl says
Maureen, it is stencil vinyl. So it’s sticky like regular vinyl it’s just opaque so you can see where you place it. I am a fan of it. It worked great and was really easy to use and get lined up!
katie says
Super, super cute!!
Cheryl says
Thanks Katie! Thanks for coming over!
Kelly says
SUPER Cute, Cheryl! I need to play with my Silhouette more. Boooo!
Cheryl says
Thanks! It was fun to make. I am already working on more :)
Brittany @ Crafty Mischief says
Too funny! I really did laugh out loud at that one! Thanks for sharing! :)
Kaitlyn says
This is adorable! Going to have to make this for my nieces and nephews :)
Cheryl says
Thanks Kaitlyn! It’s even more adorable on an adorable baby! :)
Beja {Howdy-Honey} says
I love that you dyed this onesie AND created your own design. I love comical onesies. They make a cute baby picture even more cute!
jen says
oh my that is adorable and funny!
Cheryl says
Thanks jen! I thought so too!
meriam says
i wanted to ask , can i use the vinyl again ? or only once because of the letters e and q
Cheryl Spangenberg says
Meriam, it would be tough because of the e and q and the slice of orange. You could try to use transfer paper to get it off the onesie and keep the design in tact however the stencil vinyl is attached pretty well. They make actual Stencil material that is thicker than this however you still have the e and q and citrus problem…